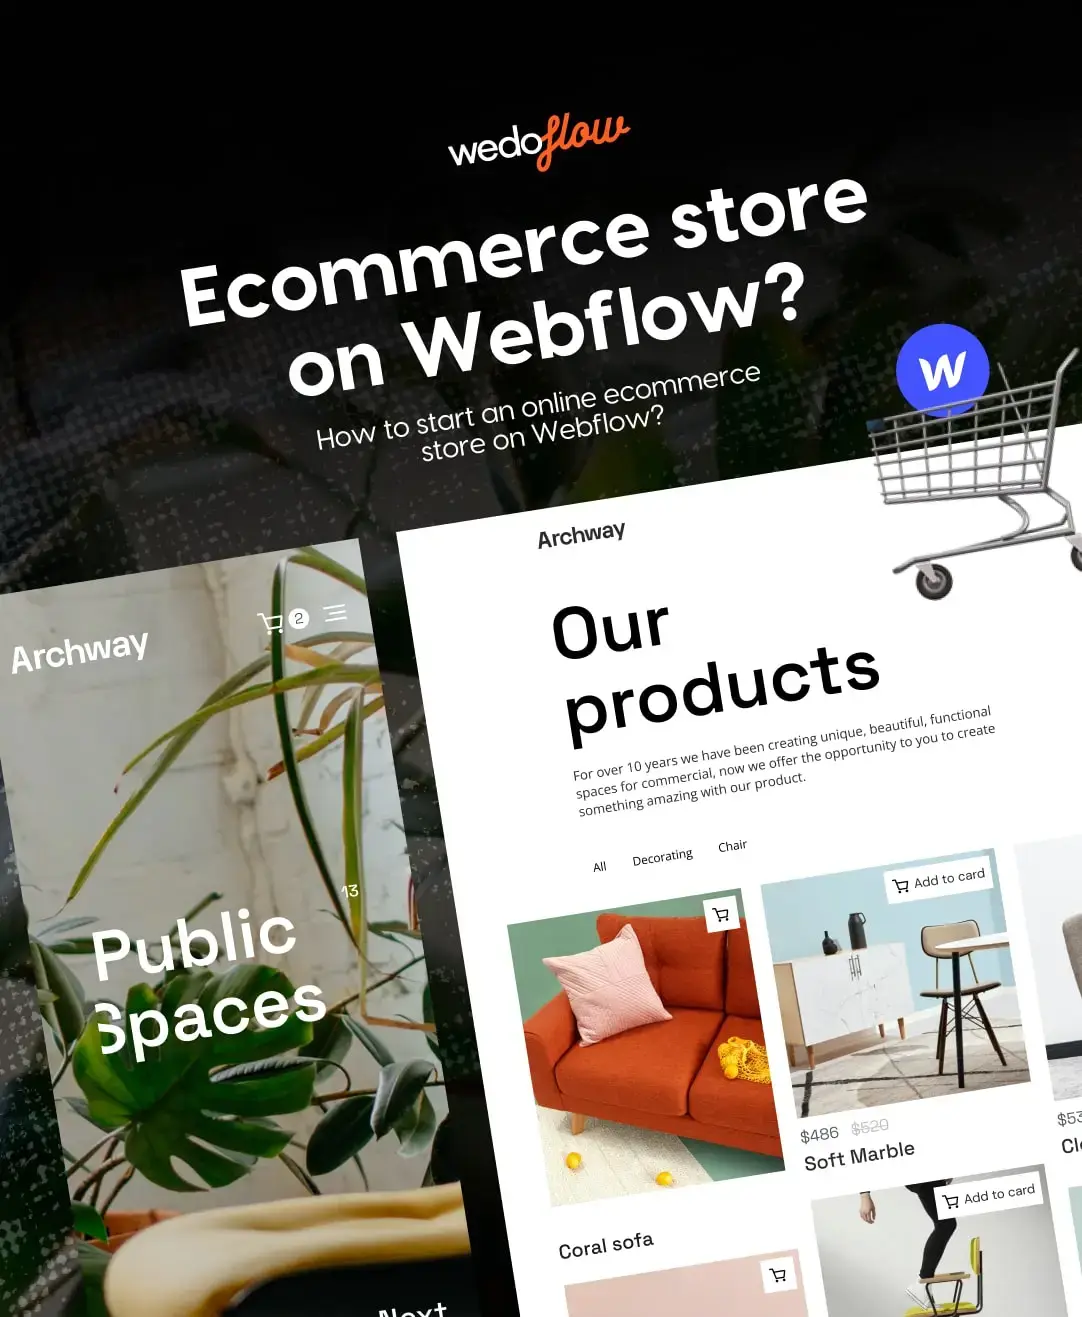
How to start an ecommerce on Webflow?
People have a long-standing relationship with commerce, consuming, and buying. Throughout history, humans have engaged in trade and commerce to acquire the goods and services they need and desire. From bartering goods for other goods, to the development of currency systems, to the rise of online shopping today, the way people interact with commerce has evolved over time.
Statistics reported by Forbes clearly demonstrate the substantial growth of ecommerce sales. In 2023 alone, sales are expected to increase by 10.4%, amounting to a staggering $6.3 trillion. Looking ahead, the report predicts that within just three years by 2026, ecommerce sales will reach an impressive $8.1 trillion.
In a world where everything moves at a fast pace, these figures emphasize the value of promptly setting up an online ecommerce presence.
Ecommerce on Webflow
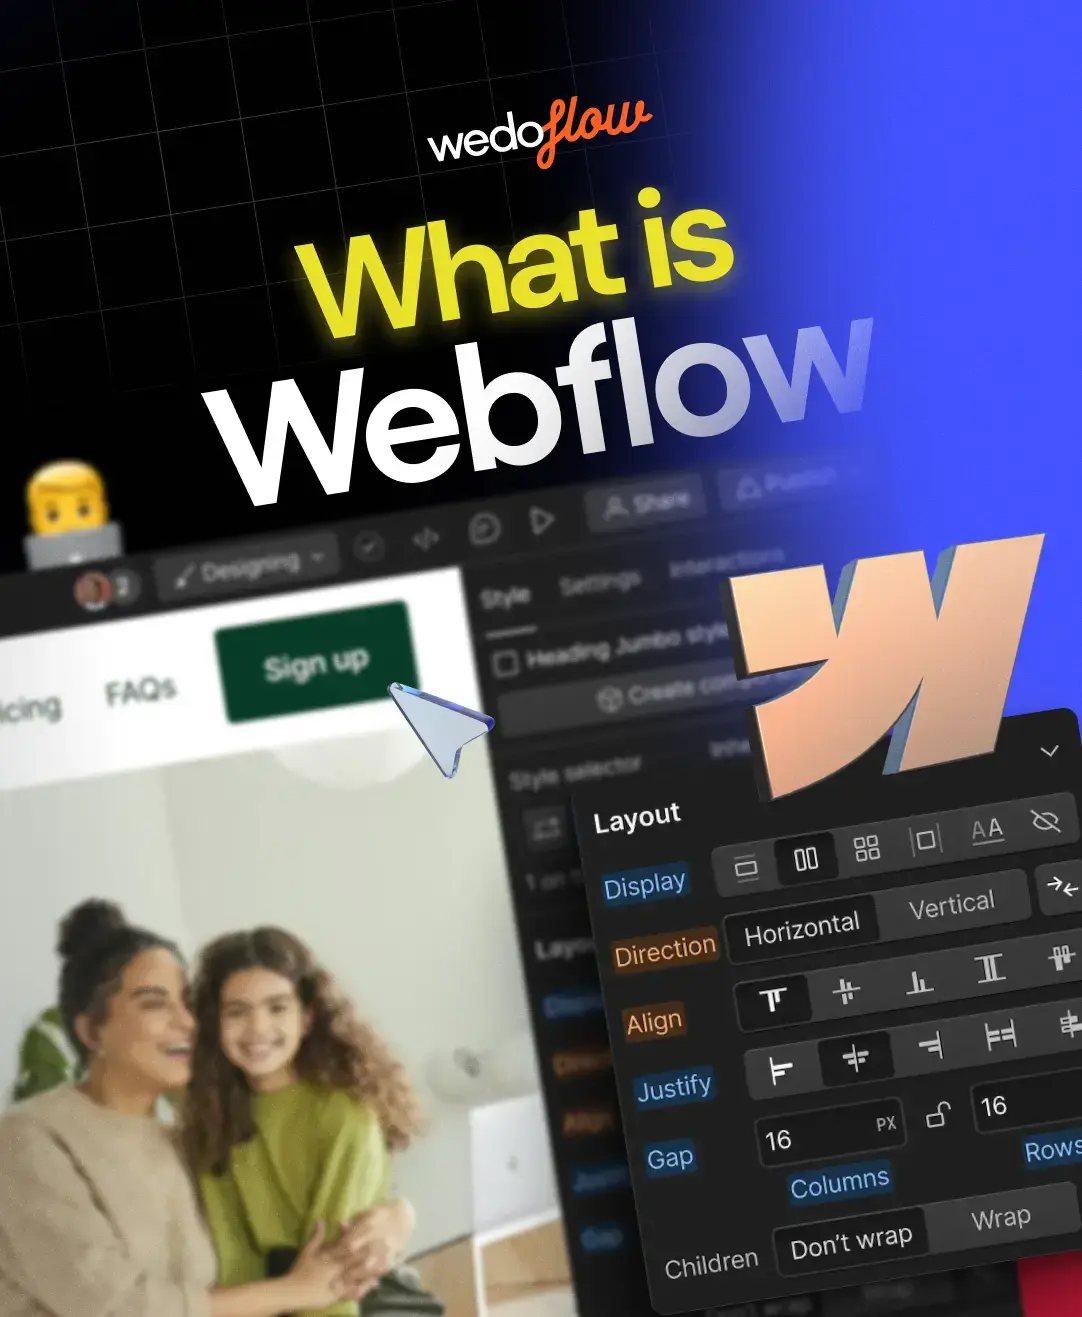
Webflow is a game-changer for ecommerce. It's a user-friendly platform that lets businesses create stunning online stores without any coding skills. With Webflow, you can design your website, manage products, process payments securely, and track orders seamlessly. It's all optimized for any device, ensuring a smooth shopping experience for customers.
Plus, Webflow integrates easily with other tools to streamline your ecommerce operations. Through Webflow, you can establish a professional online store, reach more customers, and boost your sales potential.
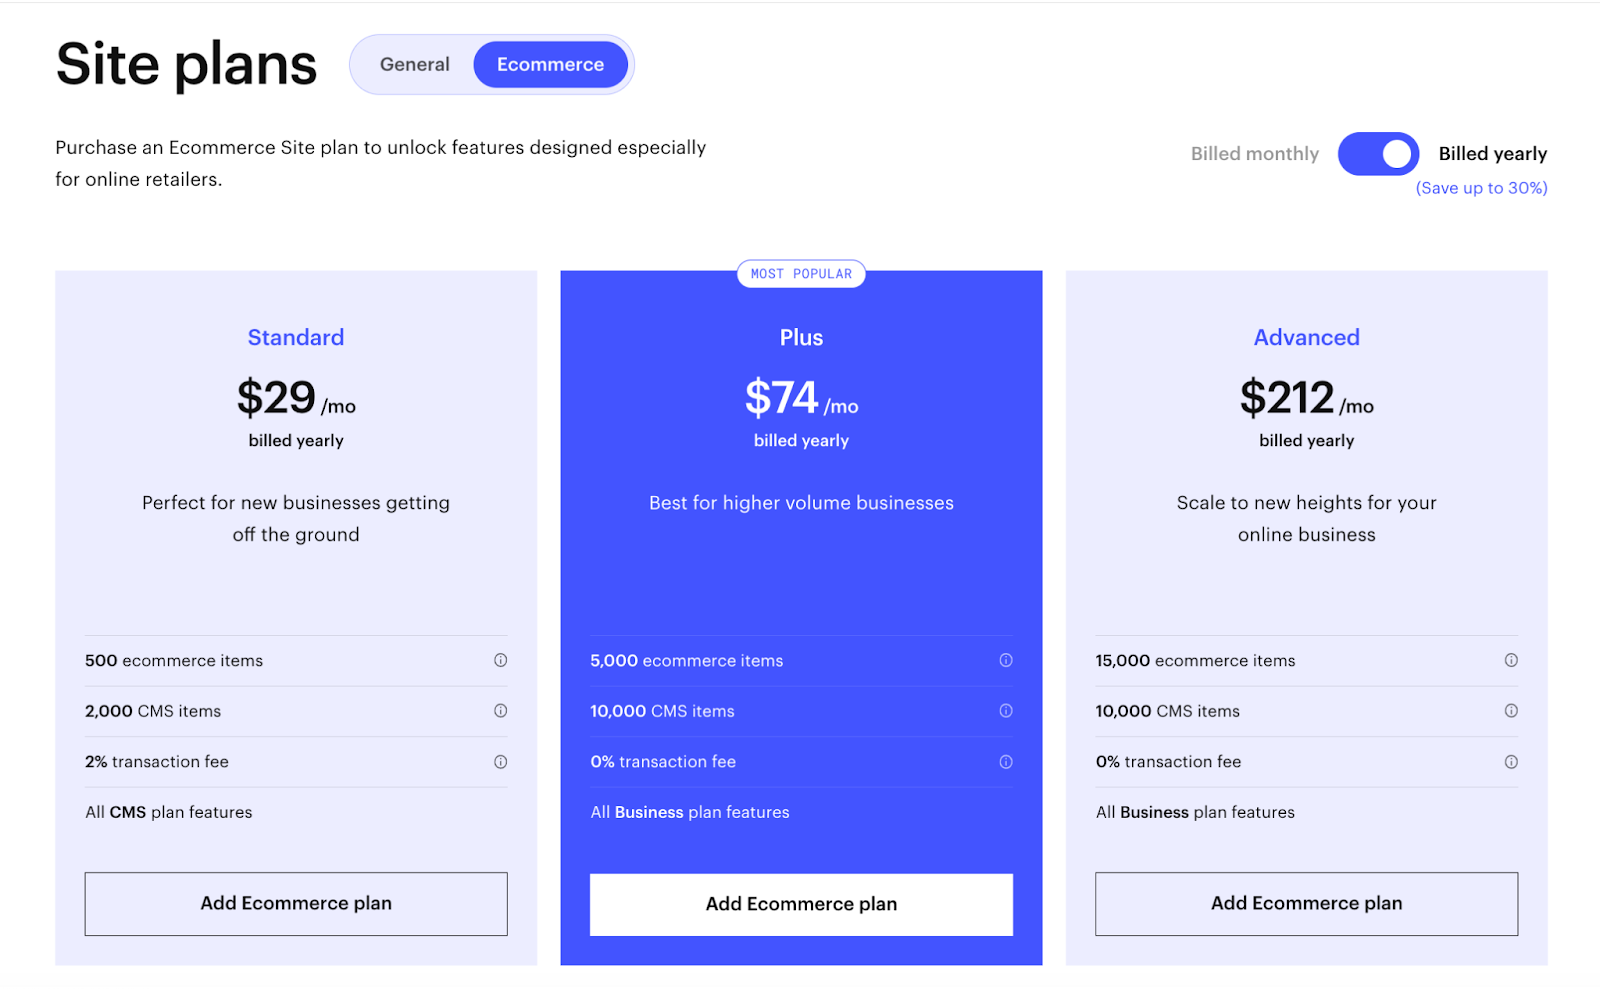
One thing we need to mention is that Webflow doesn't offer free ecommerce plans. You need to choose one of the site plans below that are appropriate for your business and then start building your Webflow store!
How to set up Webflow ecommerce store?
When setting up your ecommerce store, you can choose to use a pre-made ecommerce website template or design your site yourself from the ground up.
After choosing your ecommerce site plan, the first step you need to take when setting up your Webflow ecommerce store is enabling ecommerce functionality.
If you select a pre-made Webflow ecommerce template, ecommerce functions will automatically be enabled for you. — On that note, here are some Webflow ecommerce templates you can use for the fashion, tech, publishing and other industries! — Otherwise, if you choose to design on your own from scratch, then you need to enable ecommerce manually, so follow the steps further on!
First go to the side panel, and choose the ecommerce store button as can be seen below.
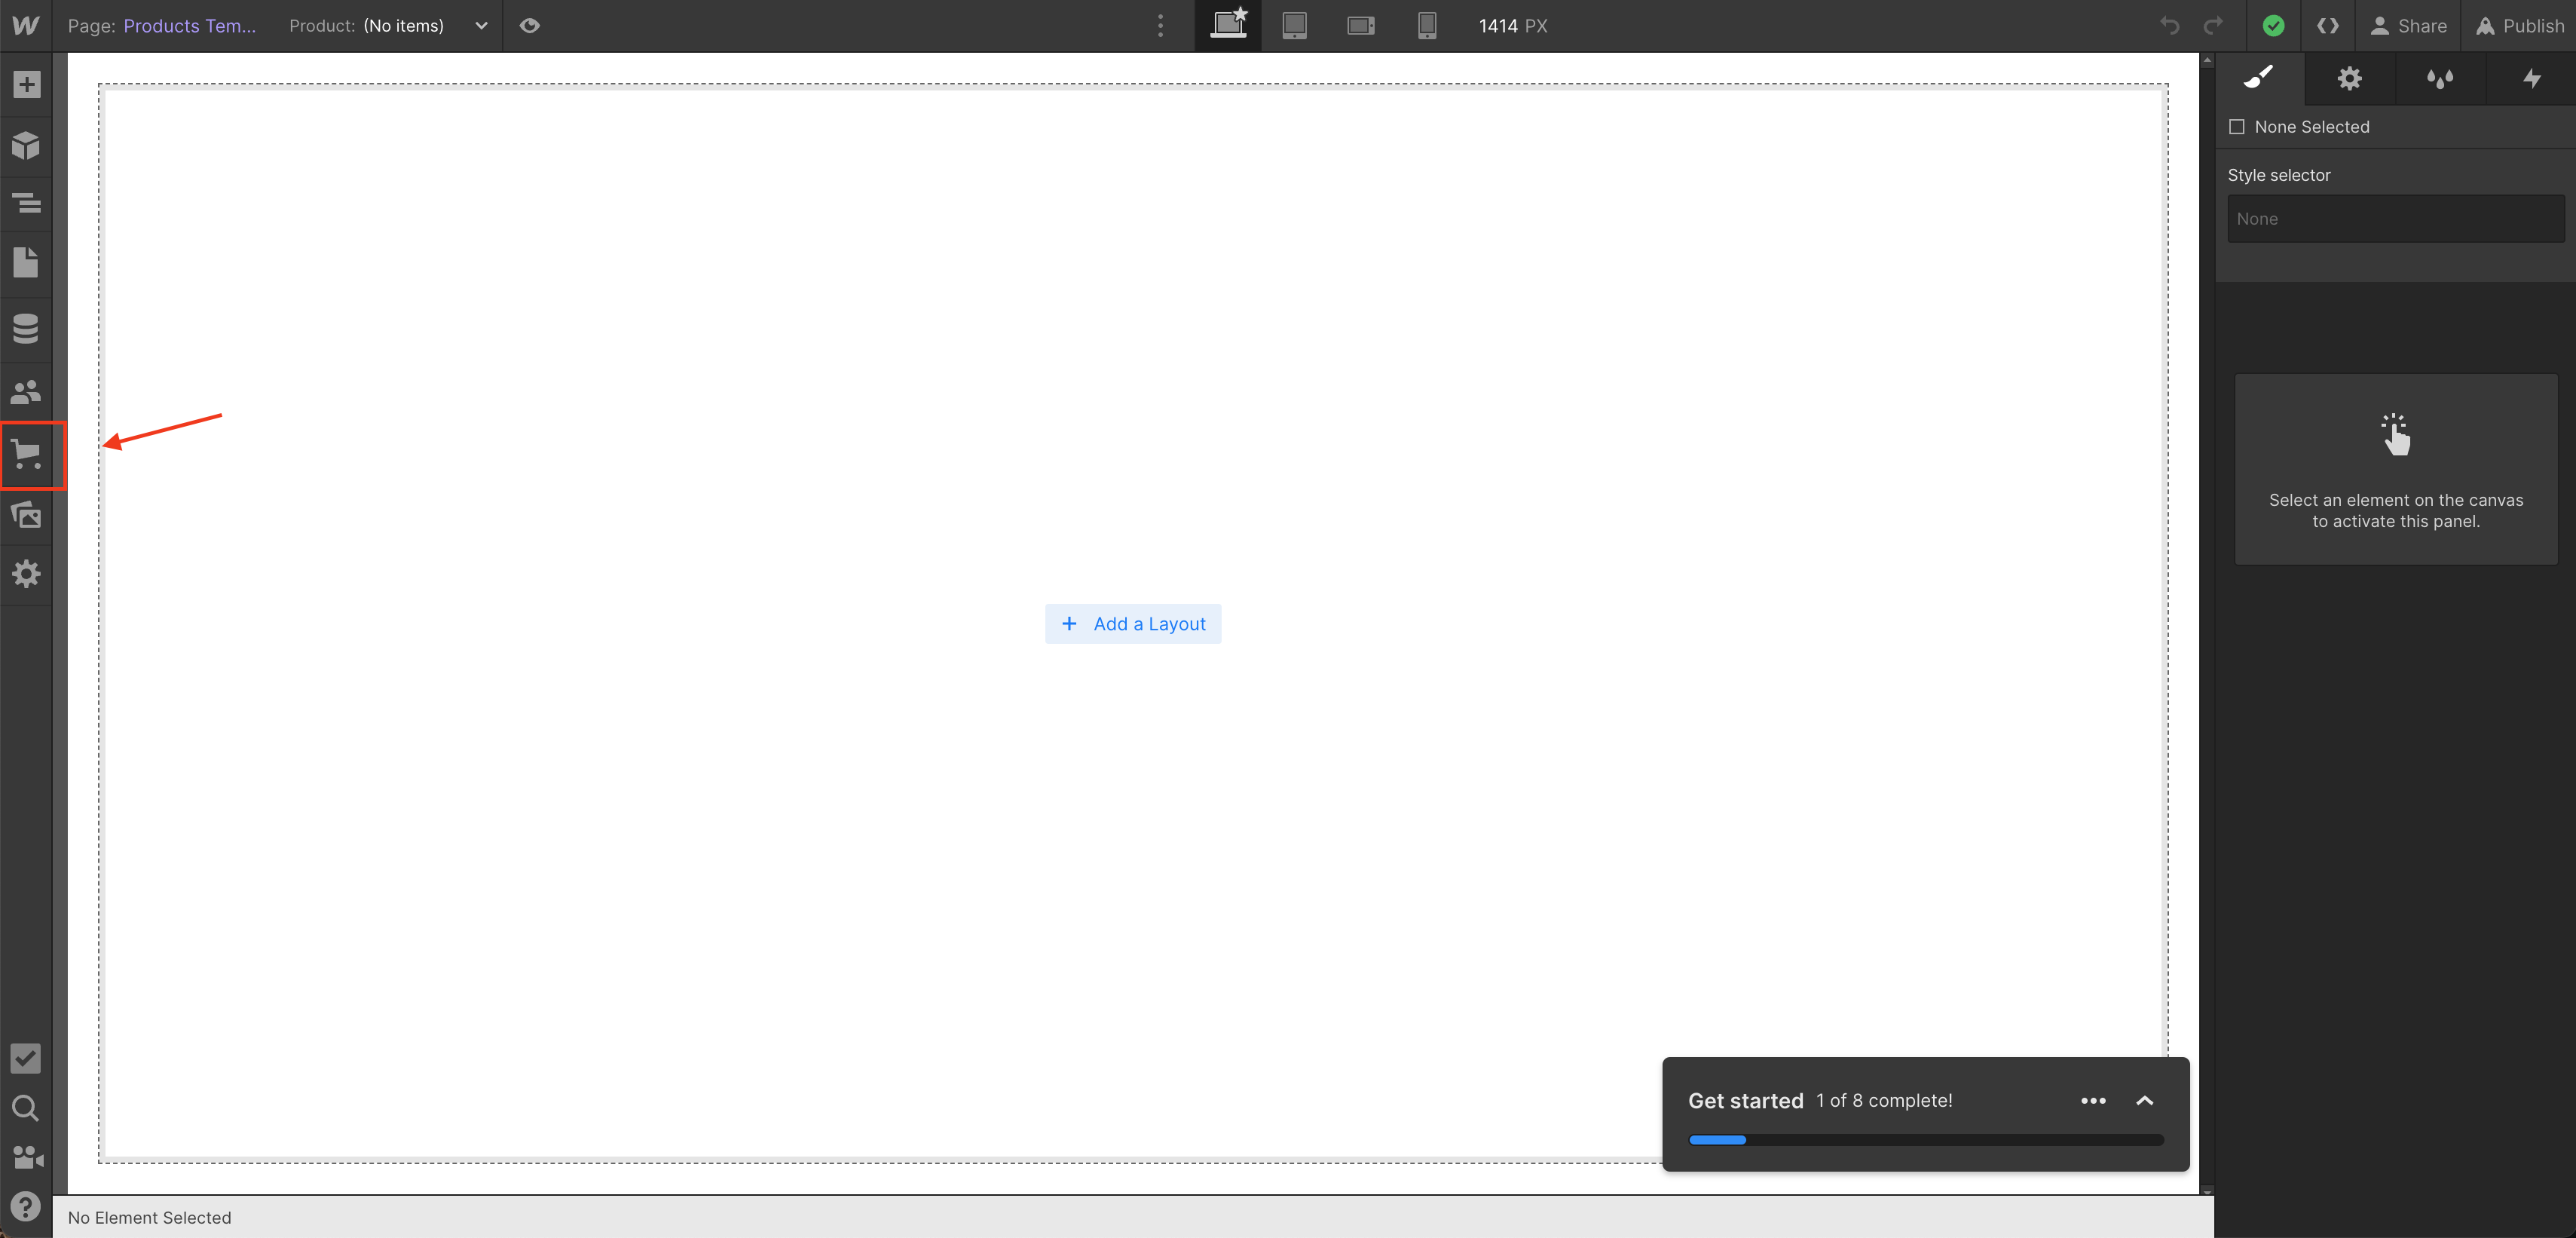
Then after you click it, a message will pop up to confirm your choice; just select “Let’s do this” and continue with the configuration.
After you do that, the setup guide window will open showing you 3 stages with steps to follow, in order to create your ecommerce store.
Completing the Webflow ecommerce setup guide
Moving on with the first stage of the process where we left, the setup guide window will open as shown below.
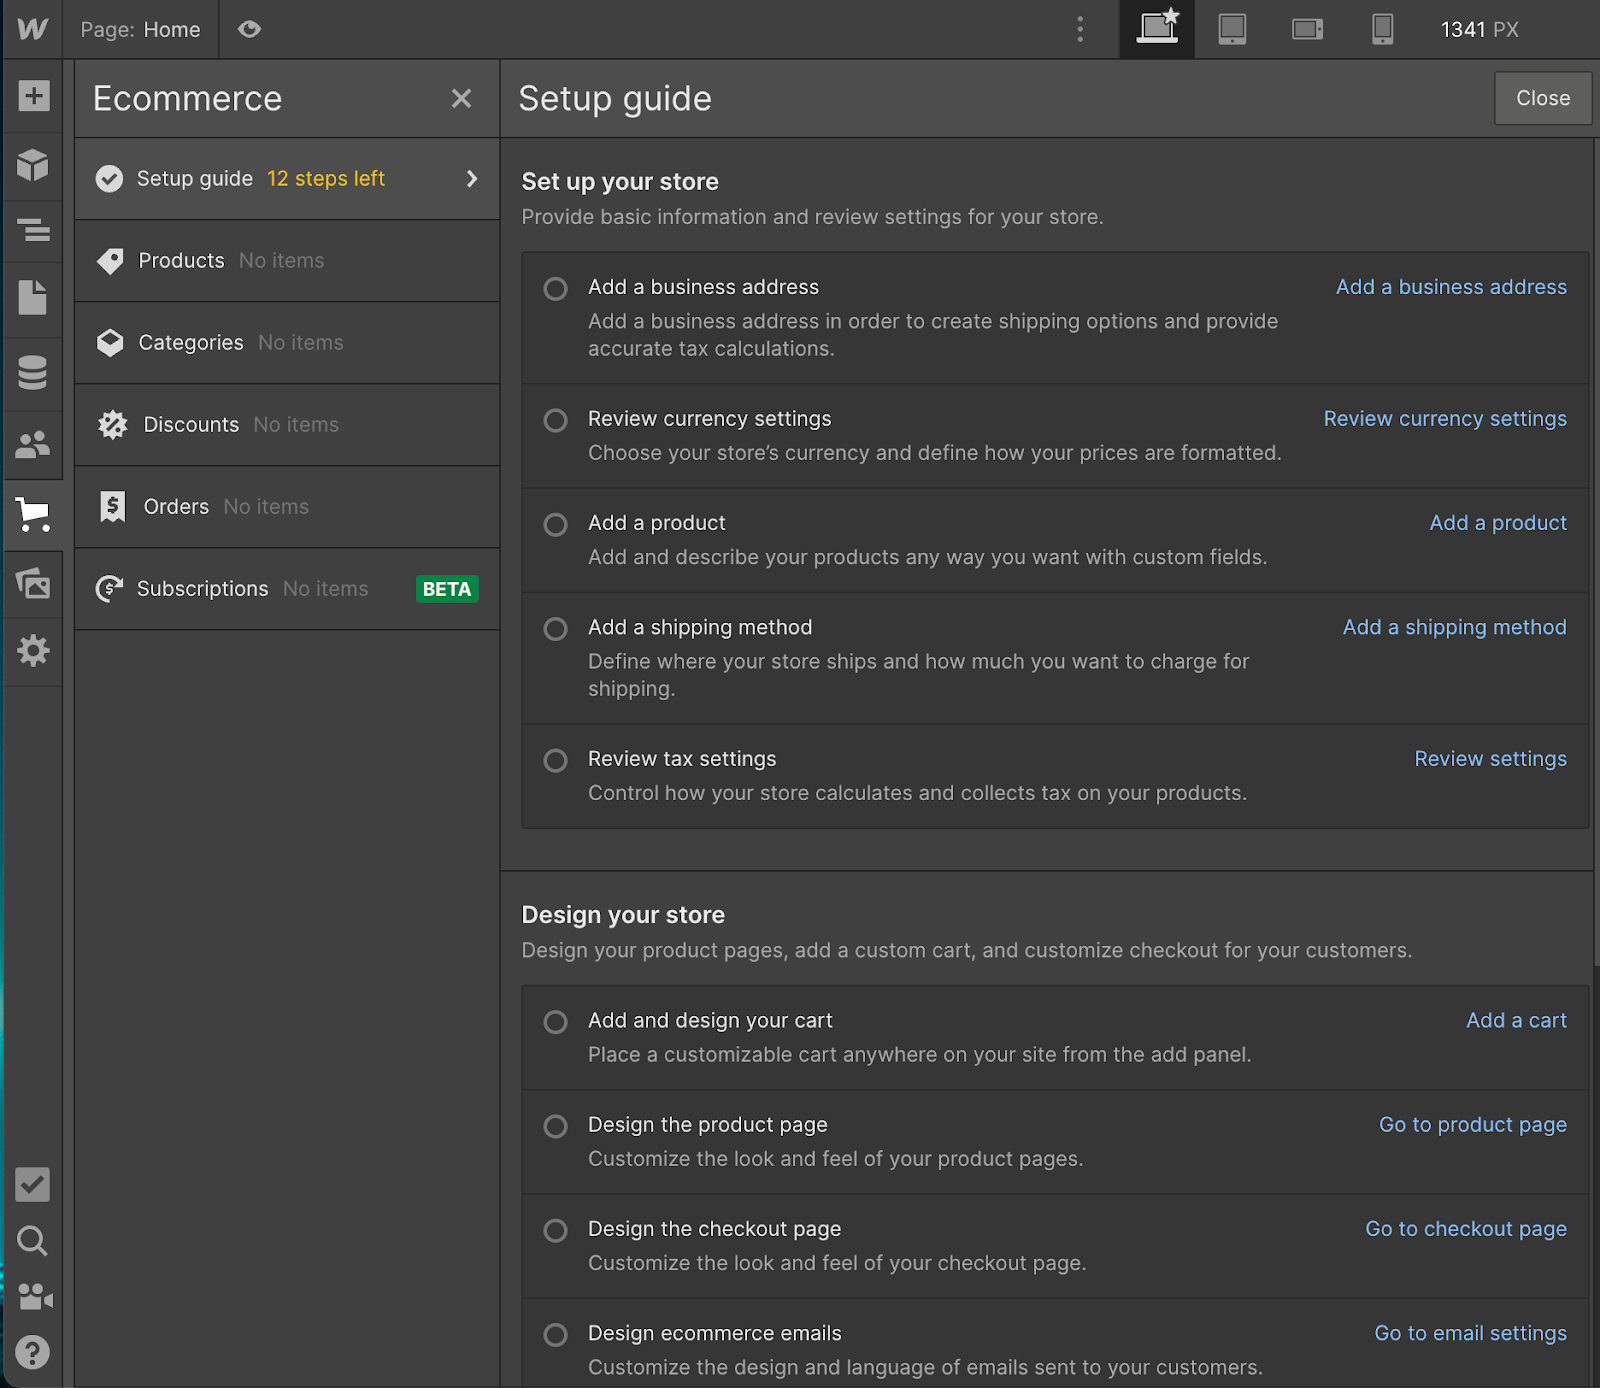
There are 12 steps or less, depending on whether you filled up that information before in the Webflow site settings. You can fill them in order or first add the products and later complete what you left out.
We chose to show them as they are in the list in order, so you don’t get confused.
1. Adding a business address
The initial step of stage one (Set up your store) is adding a business address.
On the setup guide as shown above, click Add a business address and another window will open up.
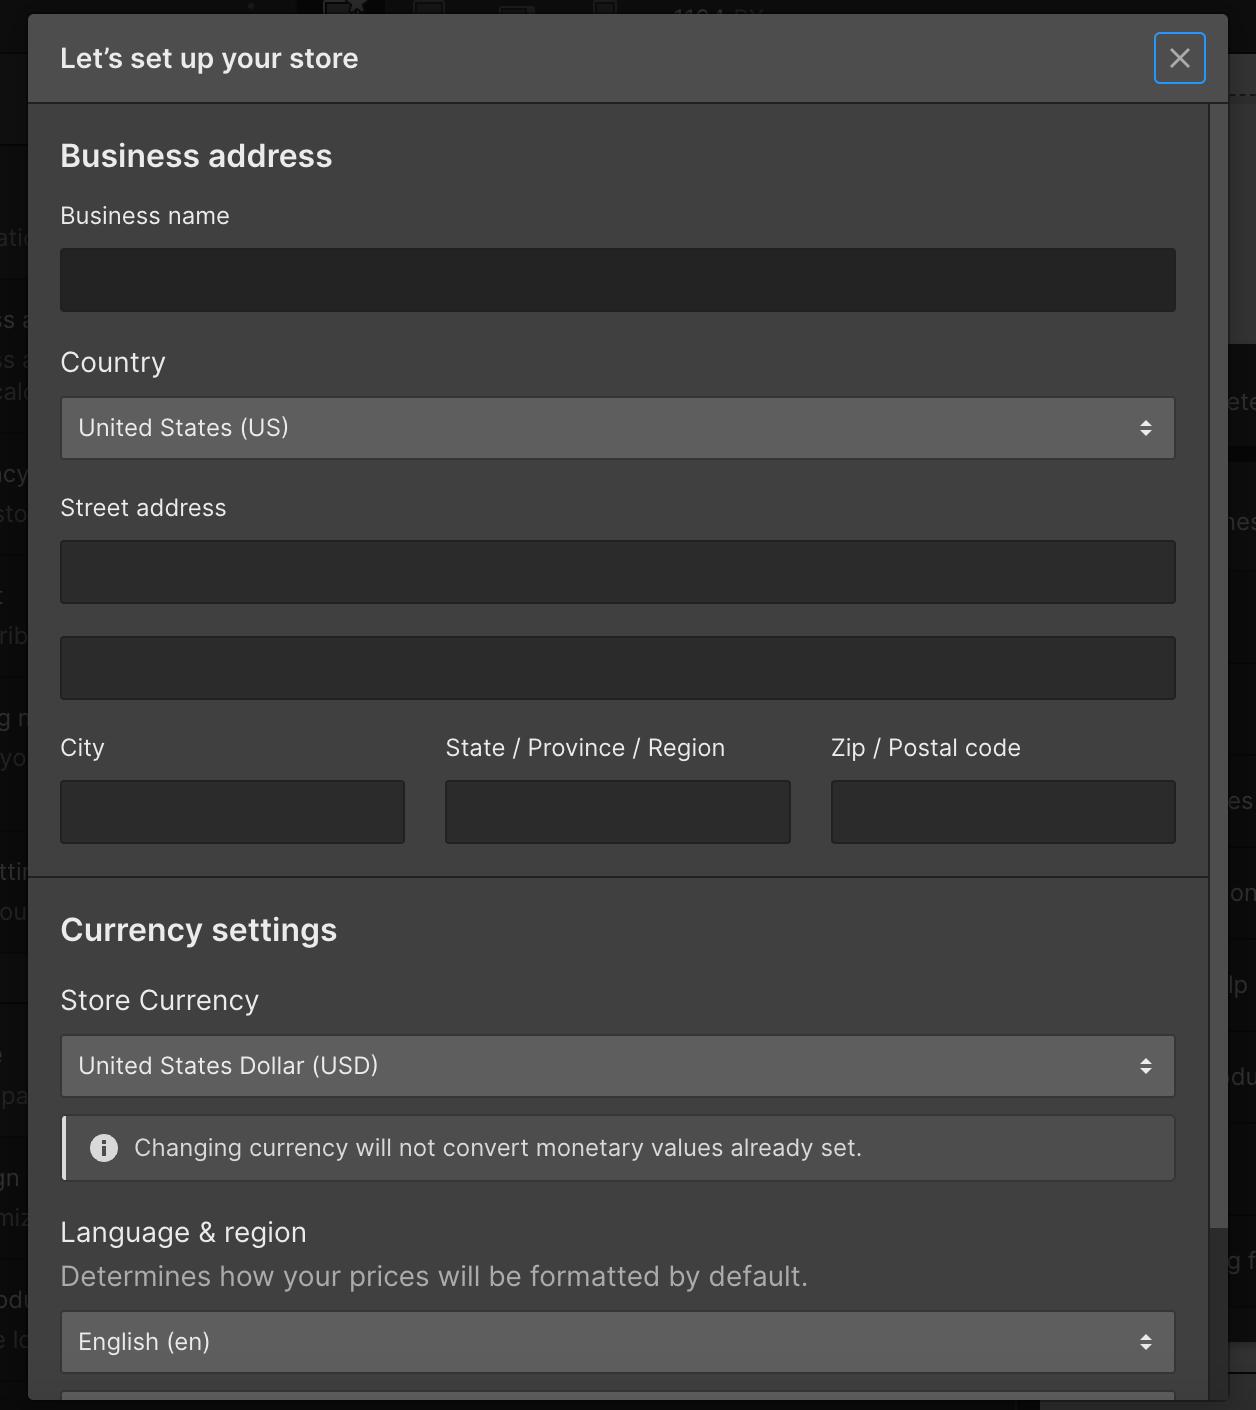
Write your business name and continue to fill up the other required fields, and then move on to the next step.
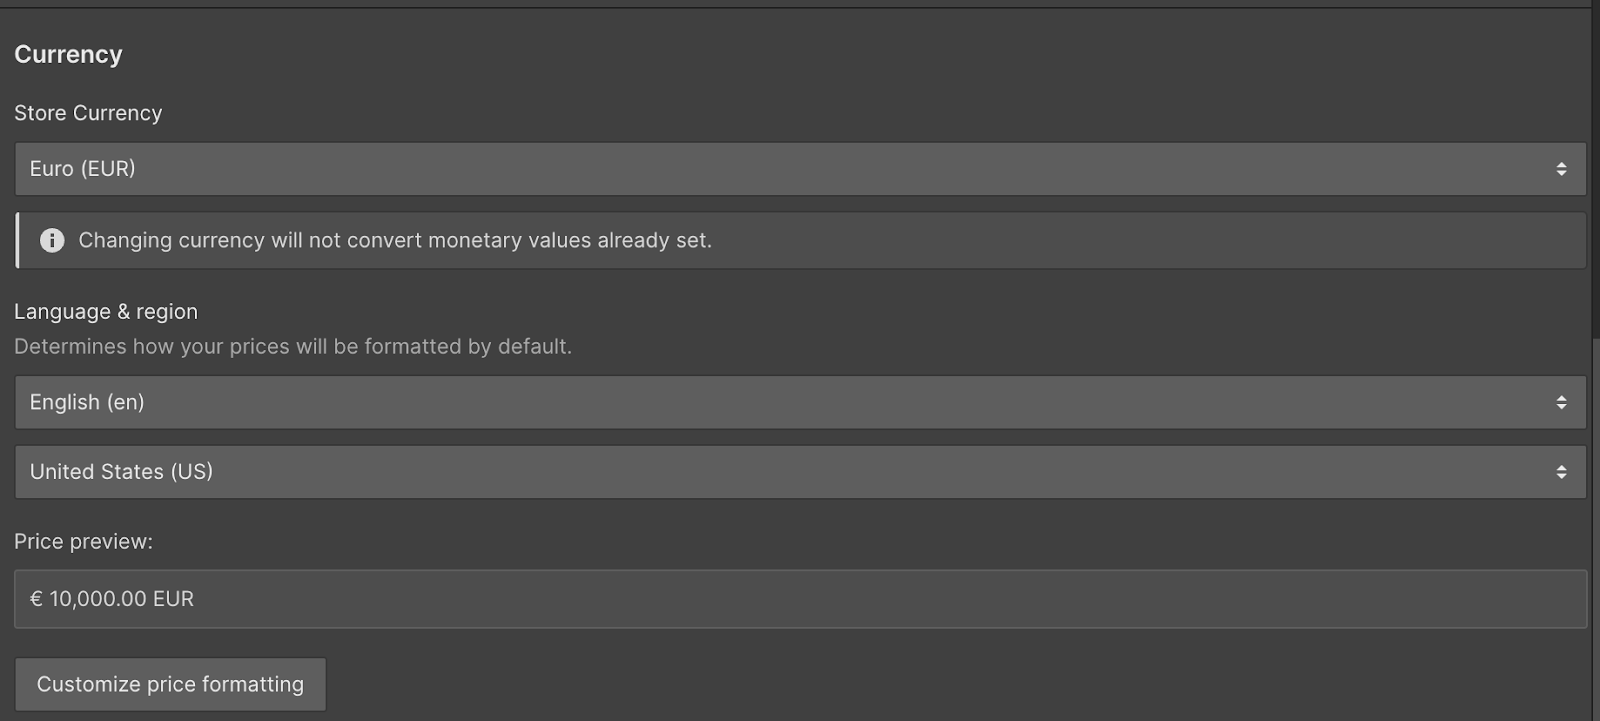
2. Reviewing currency settings
Do the same here by selecting the Review currency settings on the setup guide and choose your store currency together with your language and other mandatory information.
3. Adding a product
The third and of the most important steps when creating your store is adding your products.
Products are what keep the store alive; without them, as a saying goes, you would just need to “put your key in and close your business”.
To add a product simply click the Add a product hyperlink text, and it will take you to the windows below.
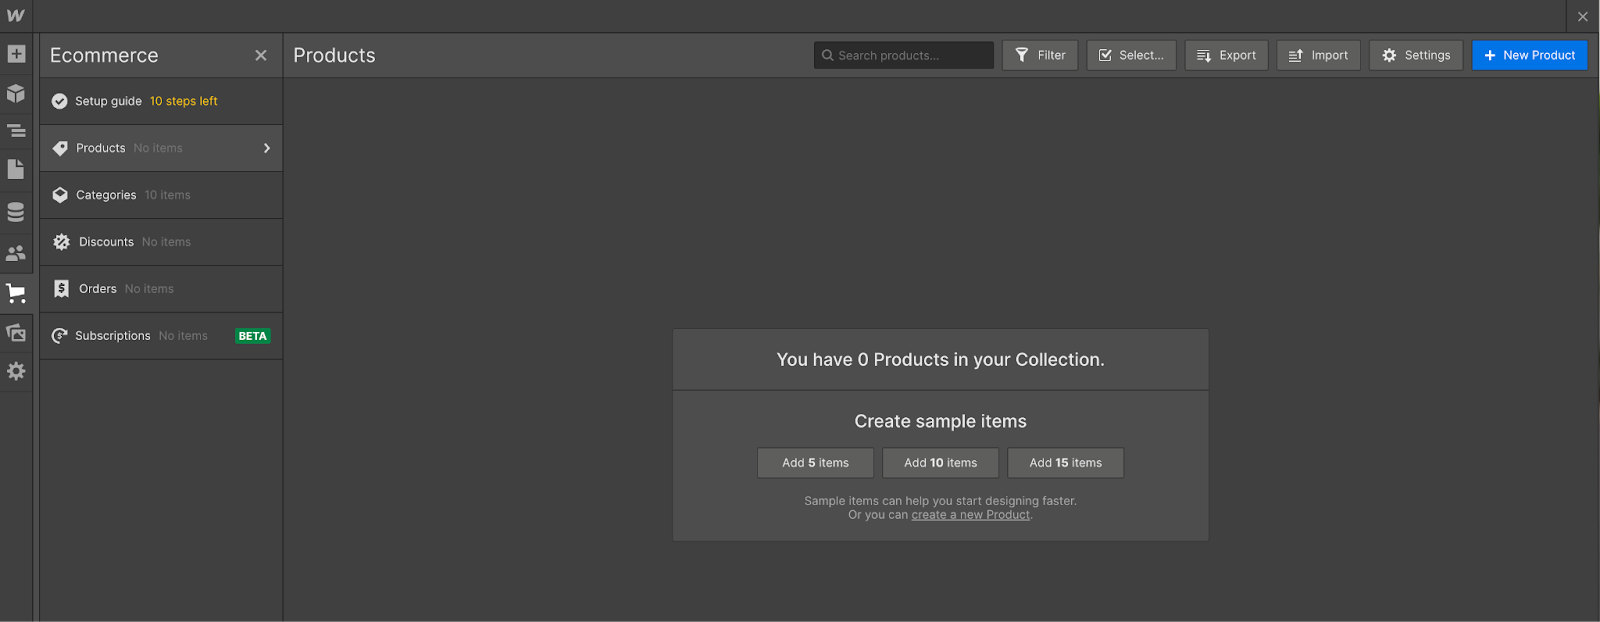
Here you can add a sample item if you want to check it out beforehand, or you can click on the New product button and fill in the information required, as can be seen in the following picture.

4. Adding a shipping method
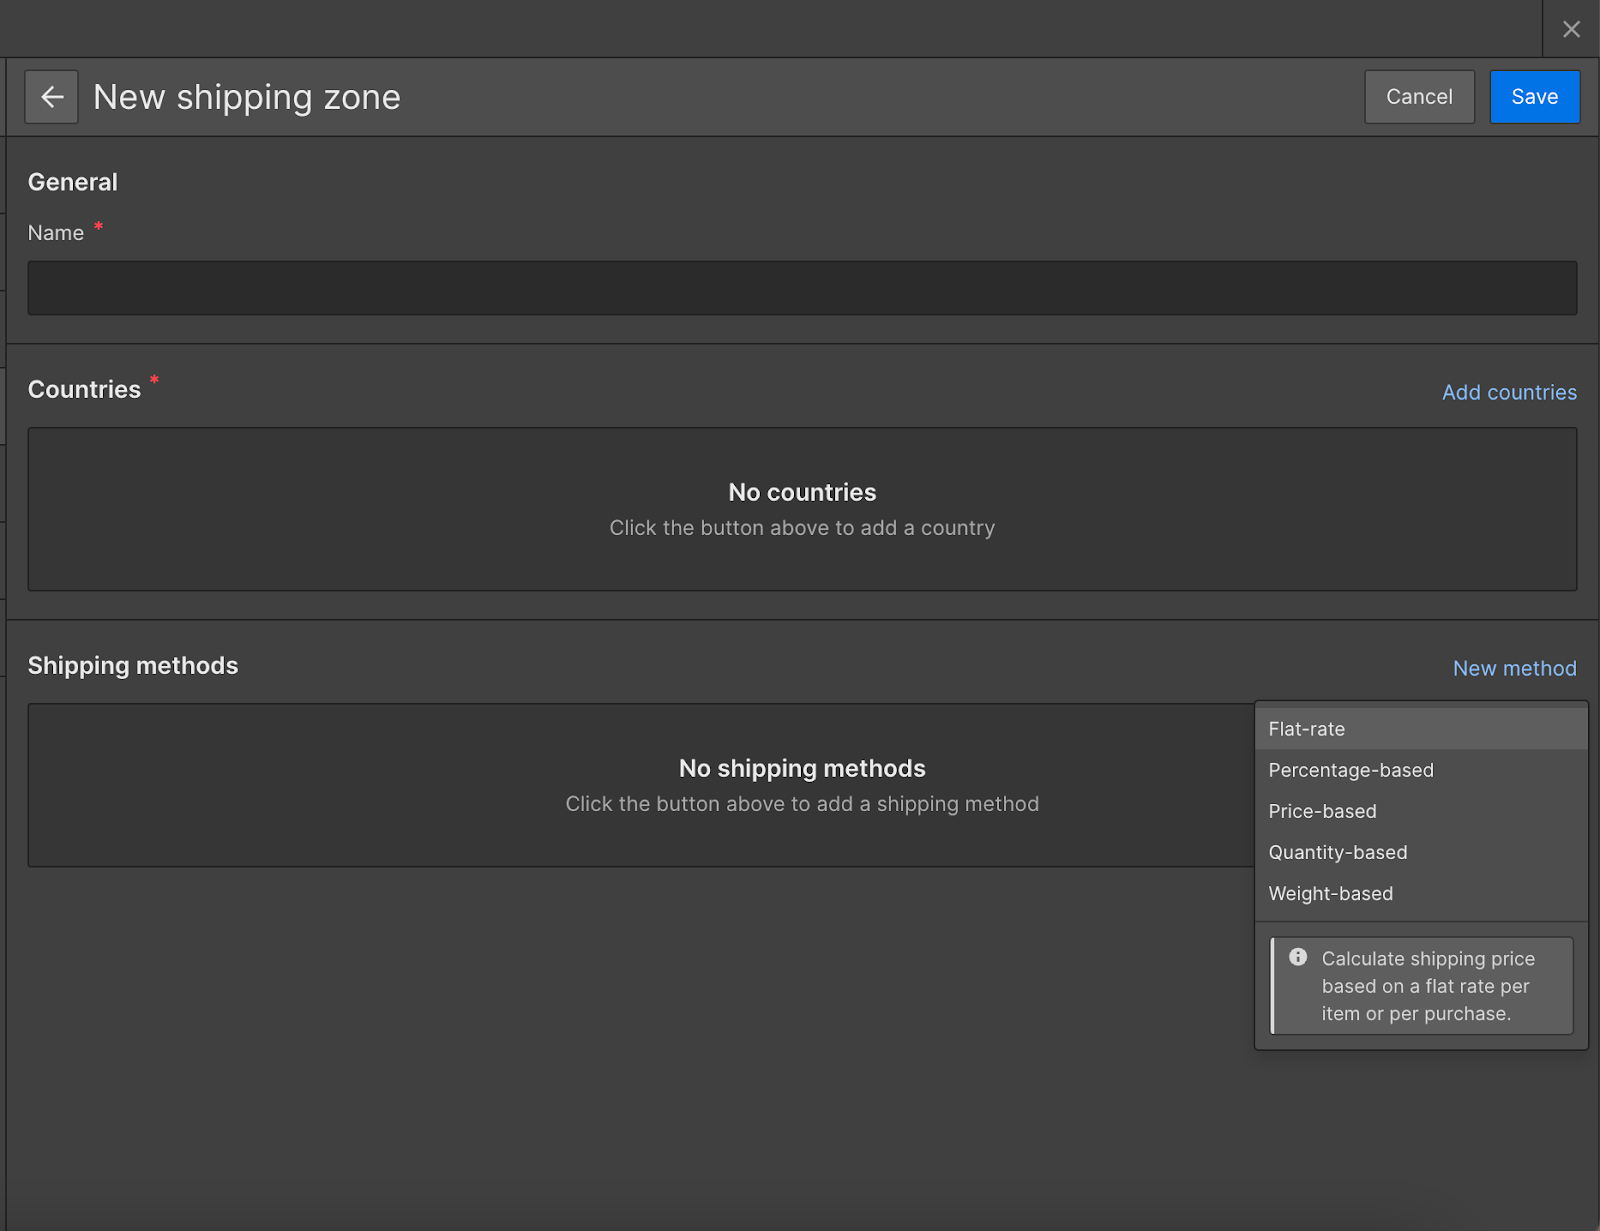
Like with the others, simply click the Add a shipping method hyperlink and then click Add shipping zone.
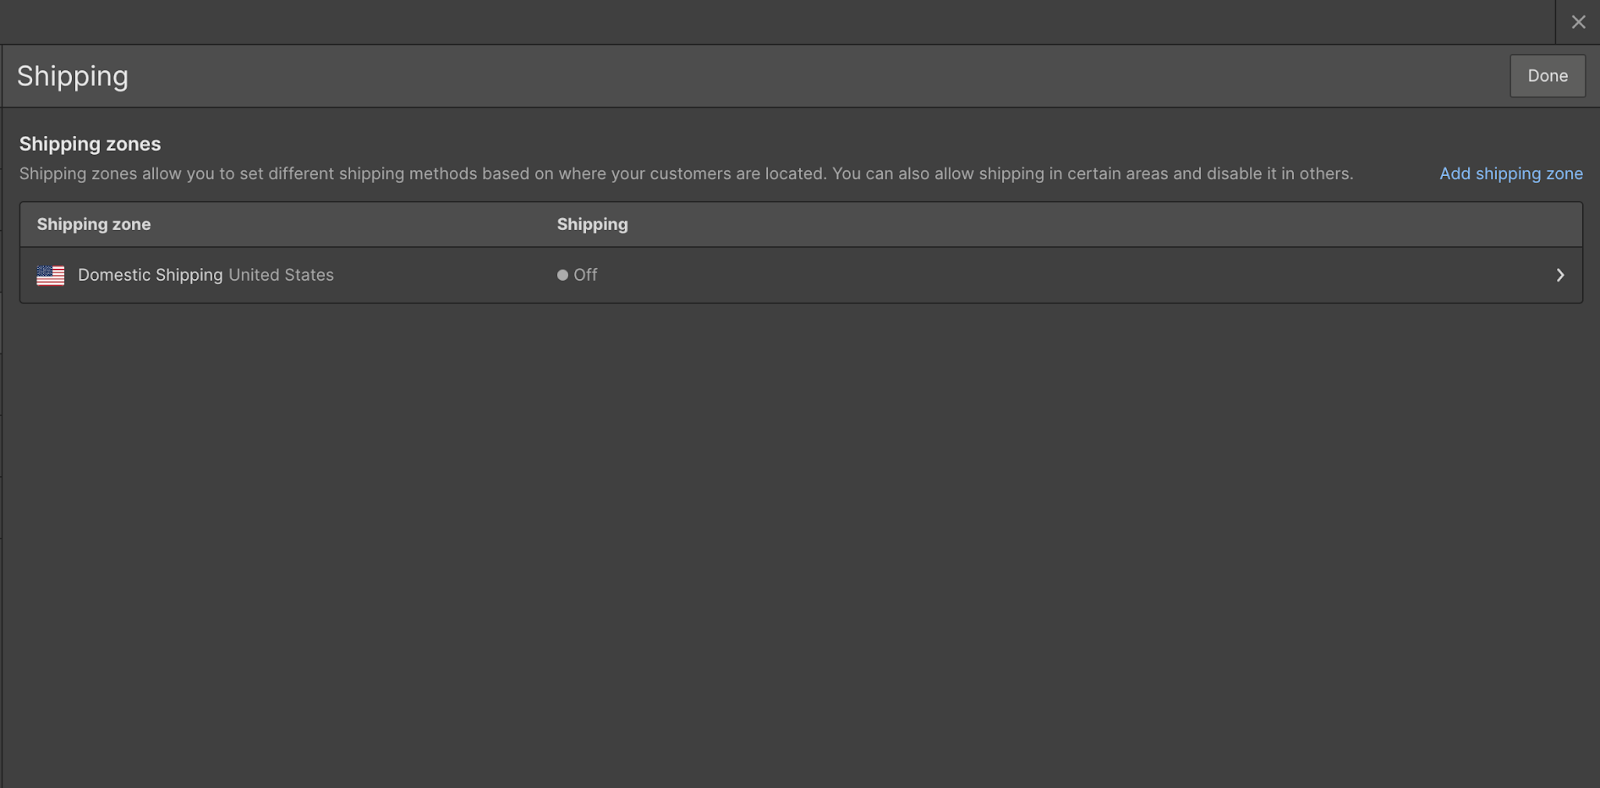
Shipping zones allow you to select between different shipping methods such as price-based, weight based, flat rate, etc, depending on your preference.
After you select Add shipping zone, the following window will appear where you can choose the shipping methods and complete the other necessary fields.
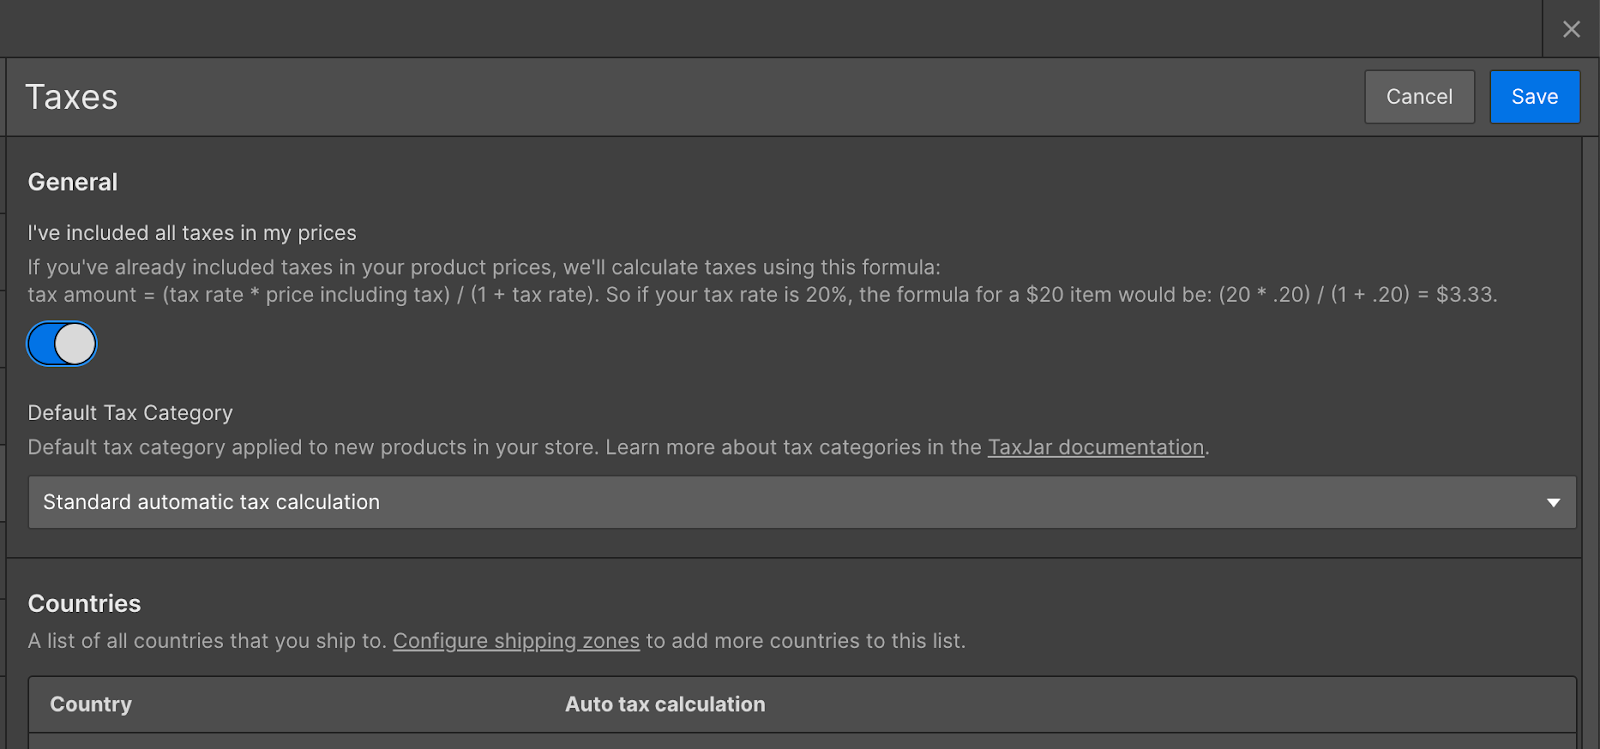
5. Reviewing the tax settings
This is the last step before you start designing your store. To do this, click on the review settings hyperlink on the setup guide, and continue to select the tax category you want, or you can also set up the automatic tax calculation version.
Designing your store
After completing the first stage of the setup guide, it's time to start designing your store. Here are the 4 steps you need to follow in this part:
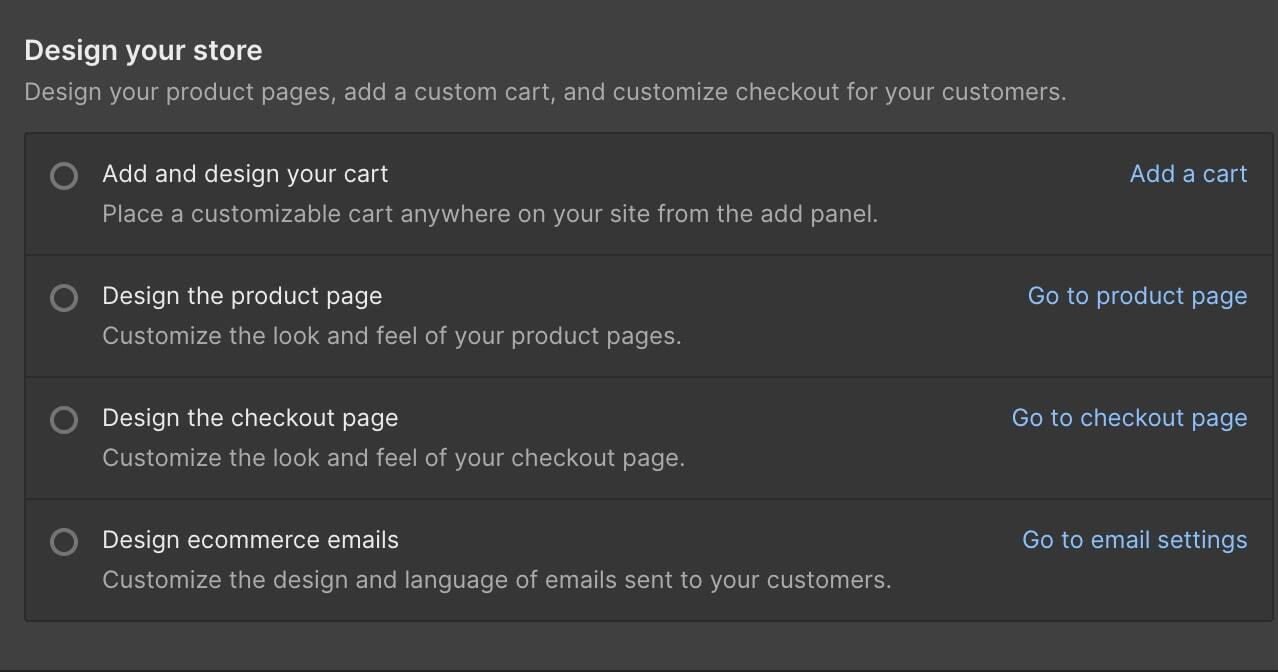
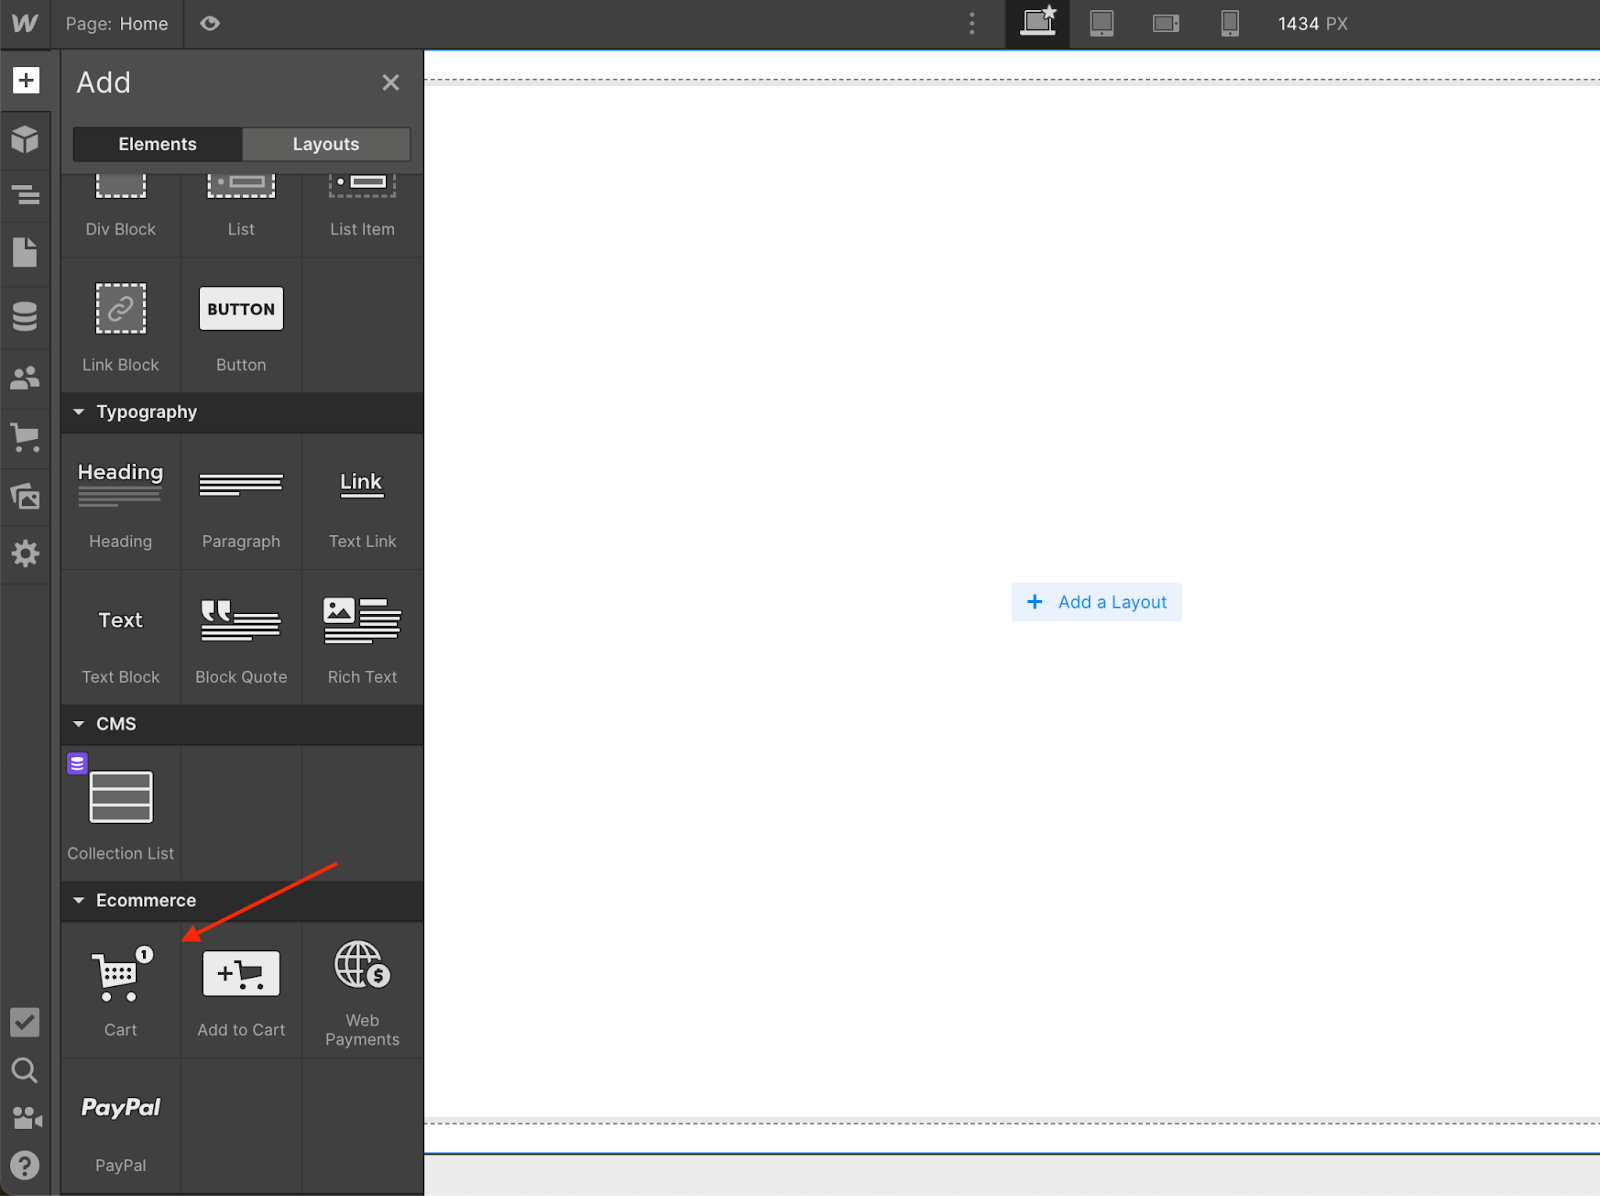
1. Add and design your cart
First go to the Designing store part of the setup guide and select the first task of adding and designing your cart.
Click Add a cart hyperlink text, and it will open the main design window. Scroll down to the Ecommerce part, and select the cart icon.
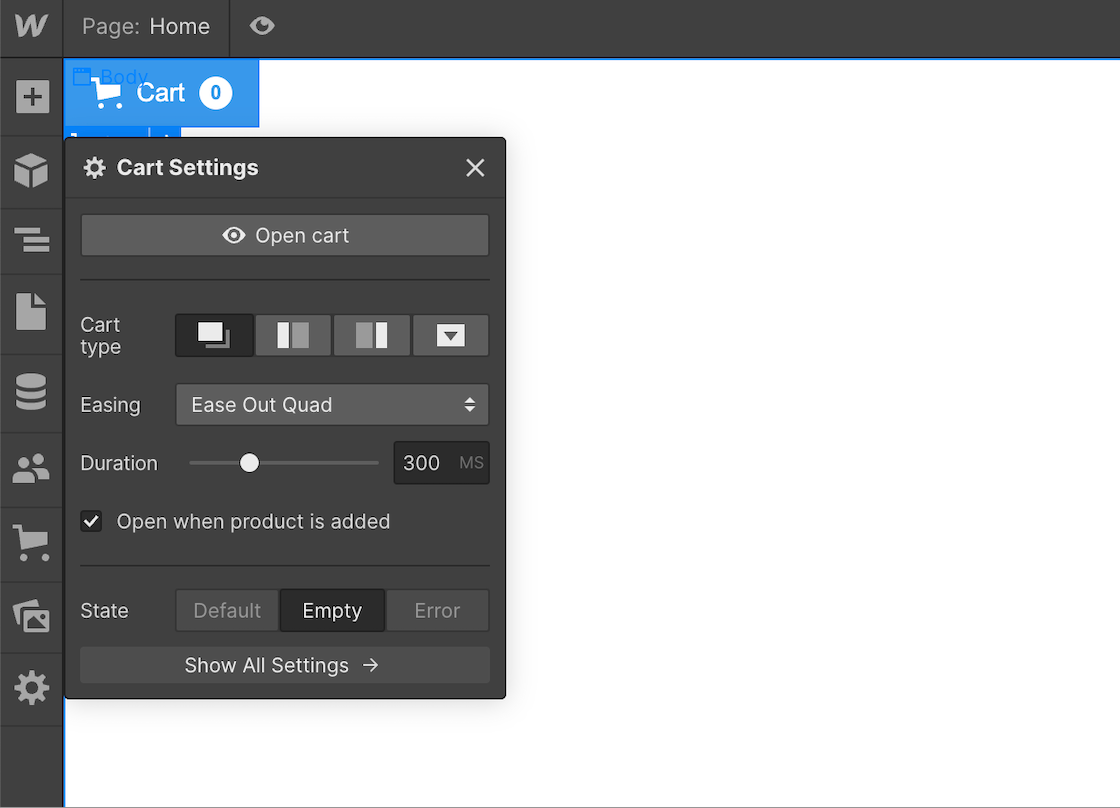
After you do that, another window will appear with the cart settings, you can modify the settings there, or close it and check it later on the right side panel of the visual canvas.
2. Design the ecommerce product page
The second step after adding your cart is designing the product page.
Simply click the Add Elements button and continue with the design. Designing a product page is just like building any other page in Webflow, so go on and show your creativity.
3. Design the ecommerce checkout page
Again, like in the previous step, designing the checkout page is the same as designing any other page in Webflow.
The only difference is that after you enable ecommerce functionality, a checkout page is automatically created with the compulsory information that should be filled in before shipping.
The only thing you need to do is adding colors and other design elements that you like, to make the checkout page fit your aesthetic preferences.
Just click on the Go to checkout page hyperlink text and immediately the checkout page window will show on the design canvas, where you can add colors and other elements according to your choices.
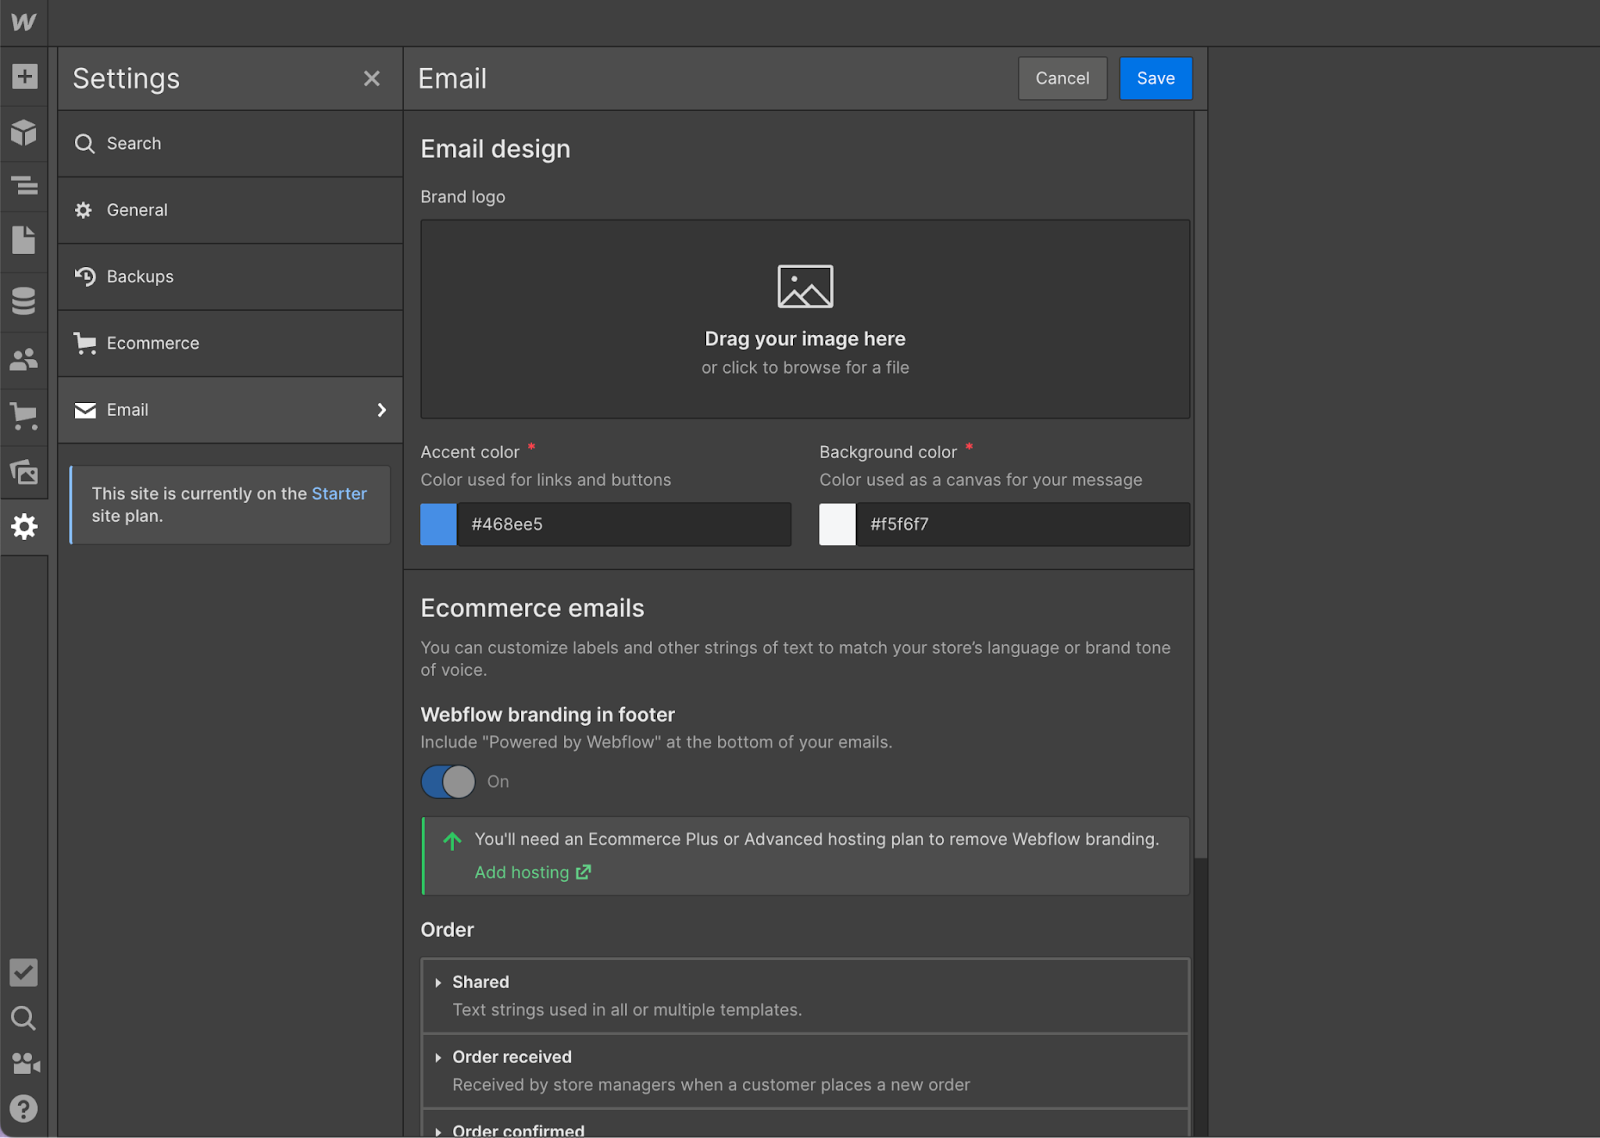
4. Design ecommerce emails
Ecommerce emails are the last step on the second stage of setting up your Webflow ecommerce website.
This is the section where you design the order emails, whether the order is confirmed, shipped, received or refunded. Each email page needs a little bit of tweaking, so the design is consistent with the rest of the page.
Before sending out these messages, it’s a good practice to validate email lists to ensure deliverability and avoid bounces.
To do this, click on the Go to email settings hyperlink, and upload your Brand logo on the window that opens up, and continue with the other details, colors and email message texts, if you want to make them more unique and distinct to the competition.
Launching your store
The third and final part when building your Webflow ecommerce store is launching your website to the public.
To do that, you need to take these 4 extra steps before the final release of your site:
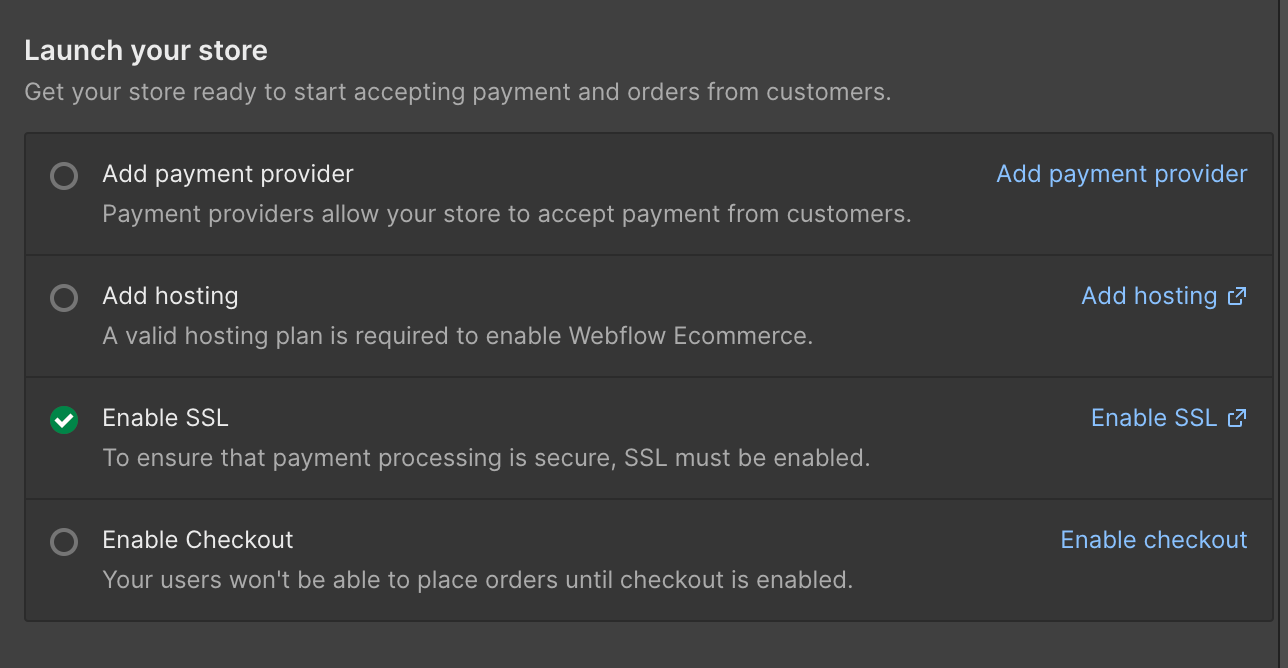
1. Add payment provider
As the saying goes “Nothing comes for free”, before launching your website you must add a provider to accept payment through your store.
To complete this task, go and click on Add payment provider hyperlink text, and then connect one of the payment providers shown on the next window — stripe or Paypal.
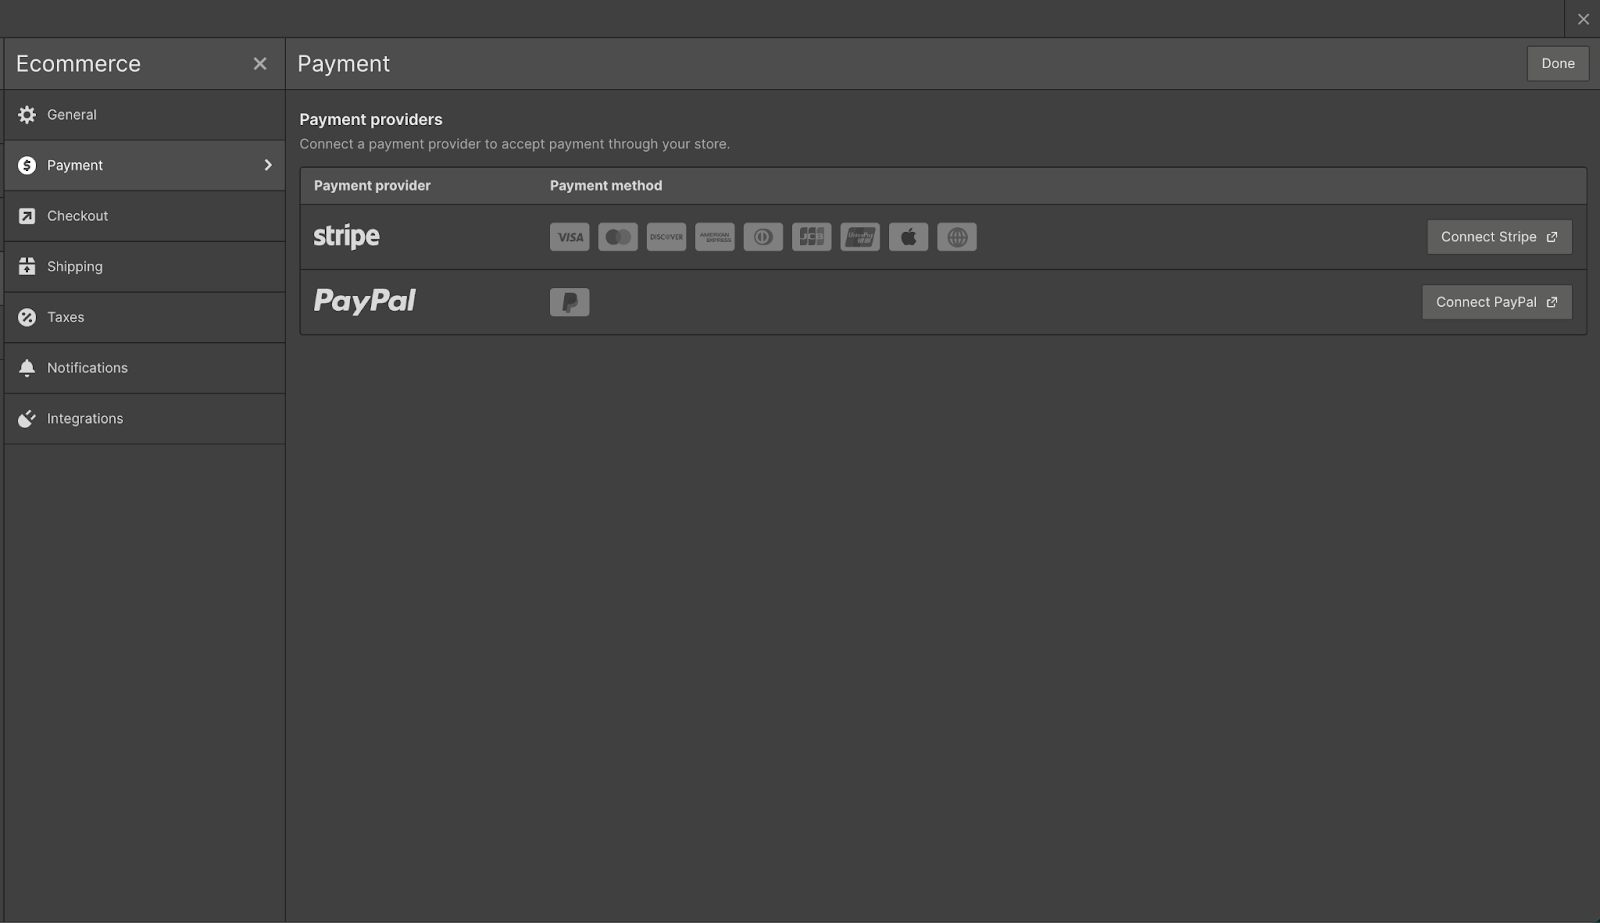
Webflow accepts payment methods via credit or debit card payments (Visa, Mastercard, American Express, Discover, Diners Club, JCB) through Stripe and PayPal, and also
Web payments (such as Apple Pay and Google Pay) through Stripe.
2. Add hosting
As we mentioned in the beginning of this article, Webflow doesn’t offer a free option when it comes to ecommerce stores.
Though you can build your site, without a site plan, you are not able to publish it, if you haven’t subscribed to one of the premium ecommerce site plans.
If you haven’t yet added an ecommerce site plan, go to the Add hosting hyperlink text in the last stage of setup guide, and select one of the plans, as shown earlier on the Site Plans picture above.
Also, it is important to know that if you already have another hosting plan, you need to upgrade it to an ecommerce plan, to be able to publish an ecommerce site.
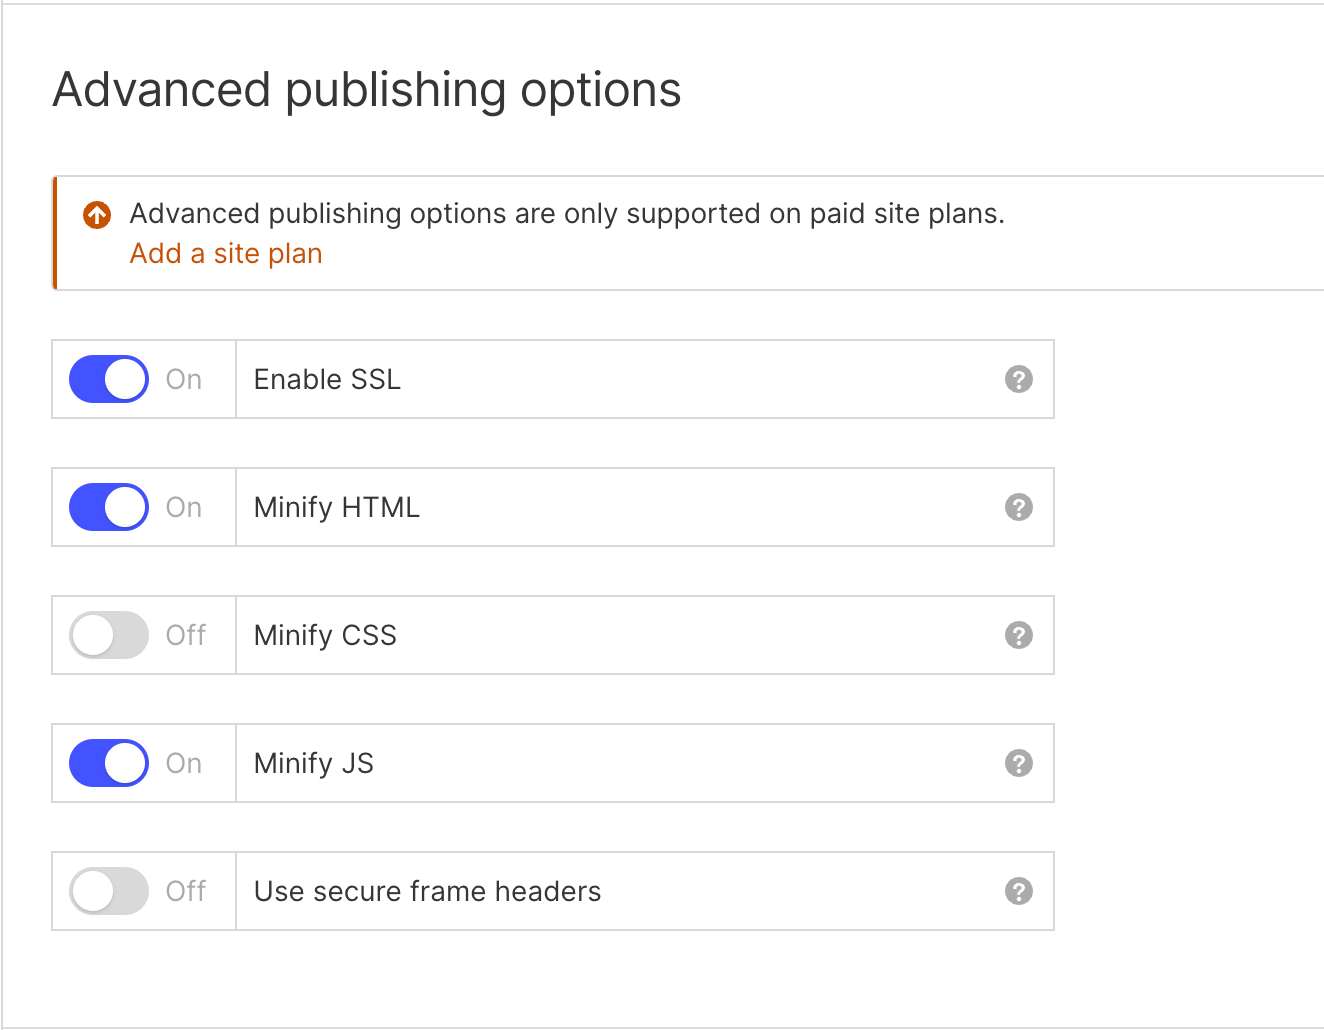
3. Enable SSL
To ensure that your payment processing is secure, you must enable SSL (Secure Sockets Layer)
Simply click on the Enable SSL hyperlink on your setup guide, and it will directly take you to the Publishing tab of Site settings.
After that, just scroll down to the Advanced publishing options and set the Enable SSL toggle to On.
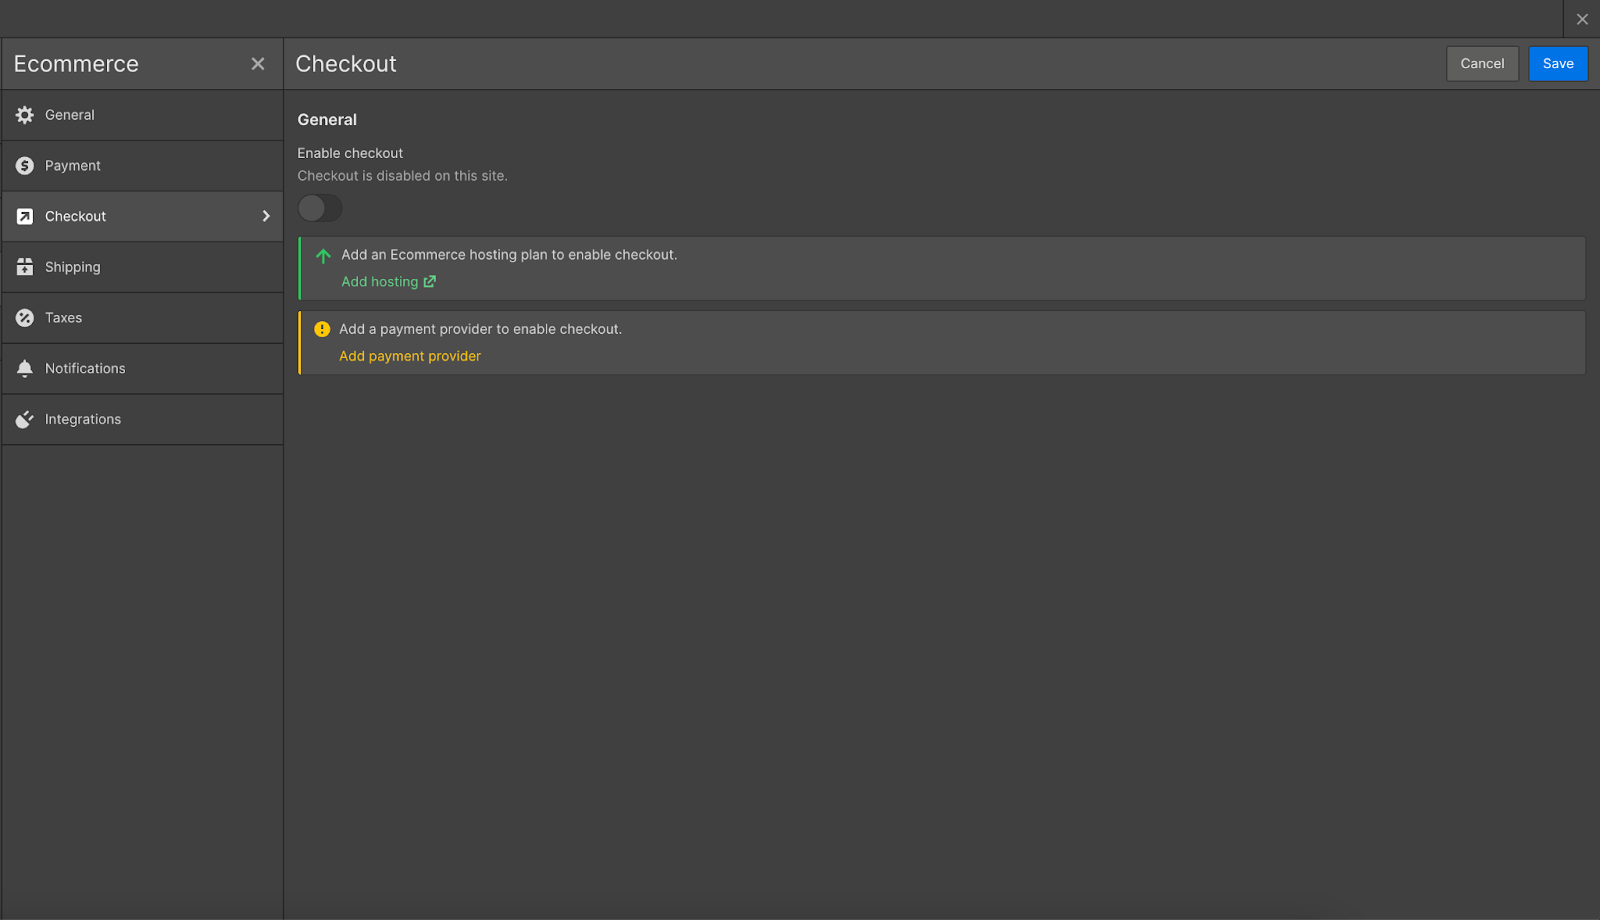
4. Enable checkout
The last and final step before publishing your site is enabling the checkout button. No user can place an order on your store unless you go through this step.
Click the Enable checkout hyperlink and turn on the toggle on the hyperlink destination window, click save and you are done!
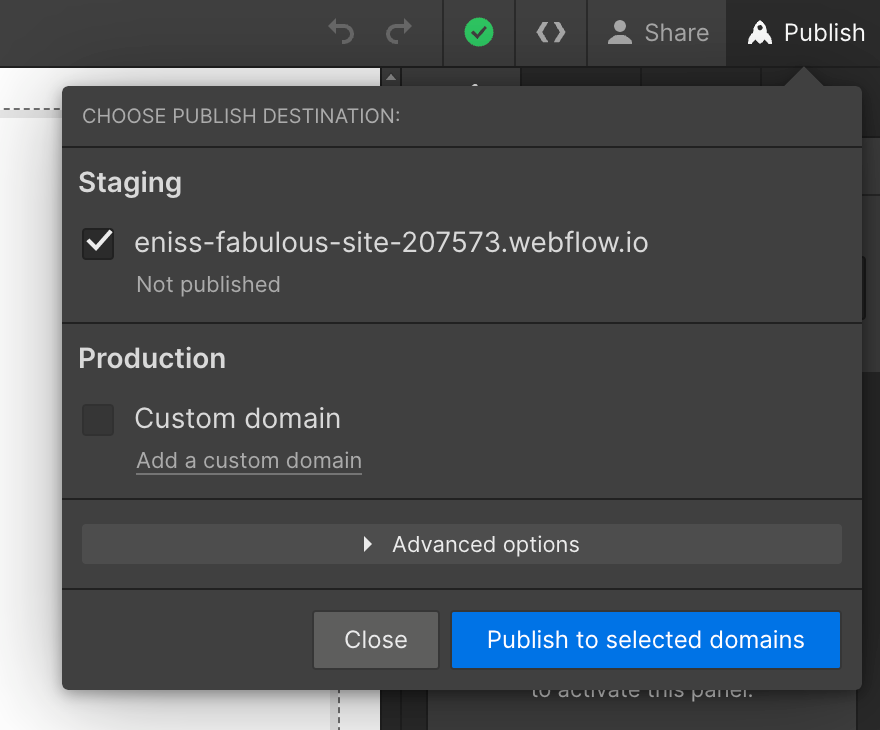
Going live
The last step and the easiest one is publishing your site. Just select the publish button like when publishing any other Webflow page to your domains and you are good to go!
Conclusion
Embarking on the journey of starting an online ecommerce store on Webflow opens up a world of thrilling opportunities for businesses to thrive in the ever-expanding digital marketplace.
In an era where visual decision-making reigns supreme, Webflow emerges as a game-changer, empowering entrepreneurs to create captivating online stores without the need for complex coding skills. With a few clicks and a dash of creativity, businesses can unleash their imagination, designing visually stunning ecommerce websites that leave customers spellbound.
If you want to check some astonishing ecommerce website template examples and not only, check our templates on the Webflow store. Lastly, as an extra bonus you can go and check out this helpful YouTube playlist from Charli Marie, which will help you even more and clarify any misunderstandings on your process of building up an ecommerce store for yourself!


-76d50c8c322d.jpg)